Hello, there today in this article I will be showing you How to Take Screenshot In LG K51.
In the previous article, I have shown you the How to Take Screenshot In Realme C21. If you have not read this post, you can read it.
To take screenshots in your LG K51, you can use any of these four methods shown below and take screenshots easily. If a method fails, you can try the remaining methods.
So, if you are searching for how to Take a Screenshot On LG K51 then you have come to the right place.
Details: LG K51
LG Launched a new phone called the LG K51. This smartphone will come with a better display, battery and camera, and a stylish design.
Let’s start with the design of the phone.
The LG K51 comes with a 6.5-inch Full HD+ Narrow Notch Display, and talking about the performance, it has an Helio P22 octa-core processor that Mediatek Coming from that will make your gaming experience even better.
Must Read: How To Take Screenshot In Samsung S21 Ultra
Now talking about the camera of the LG K51, you get to see a Triple-camera setup on the back, the main camera is a 13-megapixel with a 5-megapixel Wide Angle camera, then the 2-megapixel depth sensor for bokeh shots.
There’s also a single 13-megapixel front camera for taking beautiful selfies.
Talking about LG K51 battery specs, you get a 4000 mAh battery in this phone, you can expect a one-day battery backup with moderate usage.
Quick Specs Of LG K51
| Display | 6.5 inches HD+ FullVision Display Pixel resolution: 1560 x 720 |
| Processor | It is equipped with a (2.0 GHz, octa-core) Mediatek Helio P22 (12 nm) processor. |
| RAM | 3 GB |
| Storage | 32GB |
| Rear Camera | Triple: 13 MP+ 5 MP+ 2 MP |
| Front Camera | Single: 13 MP |
| Battery | 4000 mAh |
| Operating System | Android 9.0 (Pie) |
| Sensors | Fingerprint (rear-mounted), accelerometer, proximity. |
Method #1 – Take Screenshot On LG K51 Using Key Combination
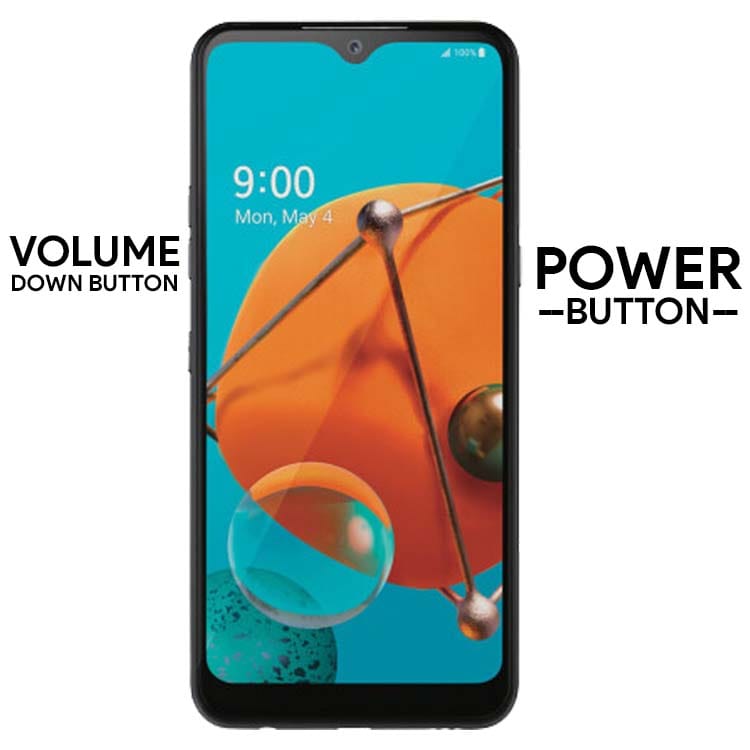
- First of all, to take a Screenshot on your LG K51, you need to open the screen that you want to screenshot.
- After that, you have to press the Volume down button and the Power Button at the same time.
- Now to see your Screenshot you go to the gallery and go to the Recently added images.
Read Here: Take a Screenshot In Redmi Note 10 Pro?
Method #2 – Take Screenshot On LG K51 with Screenshot Features
There is a Second Method to take screenshots. On some phones, you have a screenshot even without pressing a button, just you have to set this up.
- First, go to the screen that you want to capture on your smartphone.
- After that, pull down the Notification Bar.
- Then tap on the Screenshot icon.
- Now select the folder where you want to place the screenshot.
- That’s It.
Must Check: Take a Screenshot In Samsung A02?
Method #3 – How to Take Screenshot In LG K51 with Your Voice
Today all Android phones come with a Google Assistant service, you can take screenshots with a simple voice command. “Ok Google, take a screenshot,“ after which the screenshot of whatever will be on your screen will be captured. You can also add commands together and say “Ok Google, take a screenshot and share it on Facebook, Twitter.“
Must See: How to Take a Screenshot In OnePlus Nord?
Method #4 – How to Take a Screenshot On LG K51 Using Application
If you want to take a screenshot using the application, then I have come up with the best screenshot application for you.
The name of this screenshot application is Screenshot Easy, which allows you to take screenshots in a very easy way.

Related Articles:
- How to Take A Screenshot In LG Stylo 6?
- Take a Screenshot In LG V20?
- Take a Screenshot In LG Stylo 5
- How to Take Screenshot In LG W31?
- Troubleshoot Common Problems In LG Stylo 4?
Final words:
So this article was about How to Take Screenshot In LG K51.
I hope you find this article useful and good! You can see more similar Take Screenshot guides from here.
Which of the method described in this guide would you like to try first?
If you have any questions related to this article, then you can ask me in the comment section. I will definitely reply to your comment.
Don’t forget to subscribe to our newsletter to get new updates related to the posts and make sure to share this article on social media platforms.


![How to Screen Record On Samsung Galaxy Tab A8 10.5 [2 EASY WAYS]](https://tech2rise.com/wp-content/uploads/2022/02/How-to-Screen-Record-On-Samsung-Galaxy-Tab-A8-10.5-250x150.jpg)