Today in this article, I will show you a comprehensive guide about How to Take Screenshot In Vivo Y20?
If you want to know how to take a screenshot on this phone, then read this guide till the end.
I have told you in the previous take screenshot guide about how to Take Screenshot In Moto G9. If you want to read that post, you can follow this link and read it.
The best part of this article is that I have told you about Five ways to take screenshots in this guide so that you can easily take screenshots without any problems.
So if you are looking for a guide on how to Take Screenshot In Vivo Y20, then you have come to the right place. So let’s know about Methods without any delay.
About Vivo Y20
Vivo recently launched a new phone called the Vivo Y20 in our Y series, this smartphone will come with a better display, battery and camera, and a stylish design.
So let’s start with the Display of the phone, this phone comes with a 6.51-inch HD+ dewdrop notch display, and talking about the processor, it has Qualcomm Snapdragon 460 (12 nm) Octa-core processor which will make your gaming experience even better.
Must Read: Take Screenshot In Vivo Y30
Now talking about the camera of Vivo Y20, you get to see a Triple-camera setup on the back includes an f/1.8 aperture 13-megapixel primary lens, then (macro) lens of 2-megapixel, and then 2-megapixel (depth) camera.
There’s also a single 8-megapixel front camera for taking beautiful selfies.
The most important part of any phone is its battery because the phone is nothing without battery, so let’s talk about the Vivo Y20 battery, you get to see 5000 mAh big battery with support Fast charging 18W in Vivo Y20, and this phone runs on Funtouch 10.5 based on Android 10.
So let’s move towards the post, many people have difficulties with Funtouch UI and they search How to Take Screenshots In Vivo Y20, so in today’s post, I have told you 5 easy ways to take a screenshot easily.
Quick Specs Of Vivo Y20
| Display Size | 6.51 inches IPS LCD capacitive touchscreen Display Resolution: 720 x 1600 |
| Processor | Qualcomm Snapdragon 460 (12 nm) |
| RAM | 4GB |
| Storage | 64GB |
| Rear Camera | Triple: 13MP+ 2MP+ 2MP |
| Front Camera | Single: 8MP |
| Battery | 5000 mAh |
| Operating System | Android 10 On Top Of Funtouch 10.5 |
| Sensors | Fingerprint (side-mounted), accelerometer, proximity |
Five Easy Methods to Take Screenshot In Vivo Y20
1.) Using Key Combination: In this method, you can easily take screenshots using the physical buttons of Vivo Y20.
2.) Using Three Finger: Do you know that you can also take a screenshot by slide upward with Three fingers on the screen? If not then you will read about this method to take a screenshot fast.
2.) Using S-Capture: If you want to take a screenshot while sliding upwards from the bottom of the screen, then this feature is for you. Also, you will be able to Take a Rectangular screenshot, read the method to enable it.
4.) Using Your Voice: Do you know that you can take screenshots on your phone from your voice, how? With the help of Google Assistant, you must read this method below.
5.) Using Application: You can also use third-party applications to take a screenshot, in the last method I have told you an awesome app to take screenshots so that you can easily take screenshots.
Method #1 – Take Screenshot In Vivo Y20 Using Key Combination
- First, to take a screenshot, Open the screen you want to take a screenshot.
- After that, Simultaneously hold down the Volume Down Button + Power Button to take a screenshot.
- You can see the screenshot by going to the Gallery>>Screenshot section.
Must Read: Take Screenshot In Vivo Y50
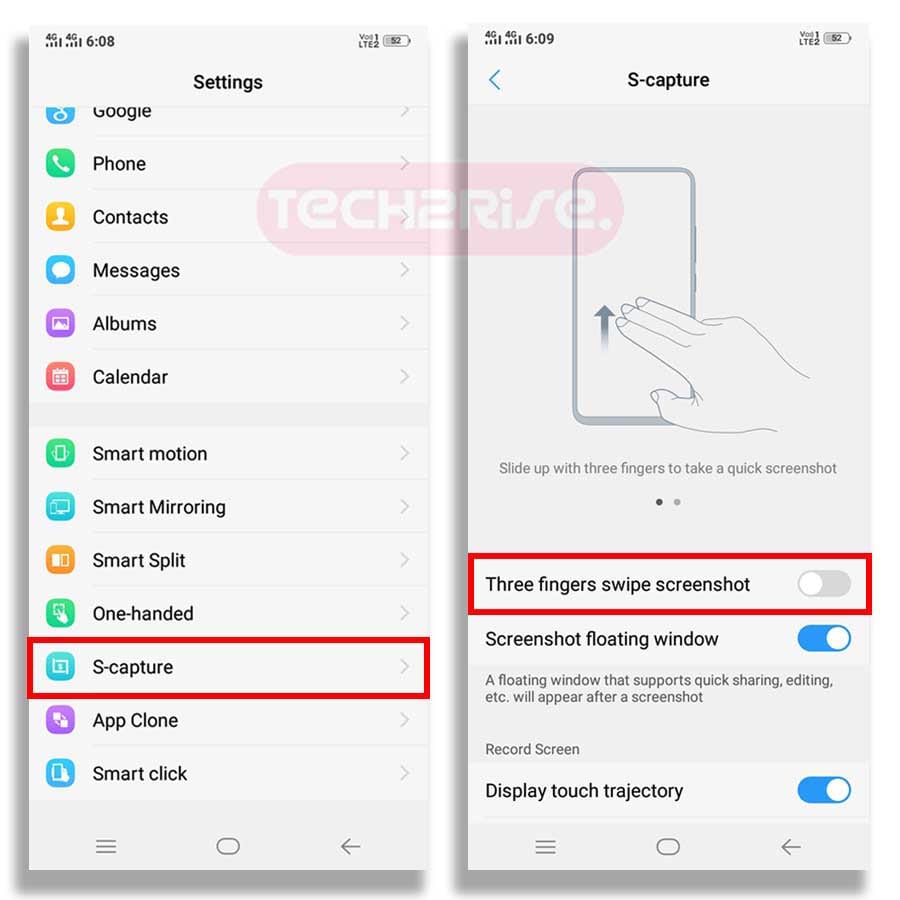
Method #2 – Take Screenshot In Vivo Y20 Using Three Finger Screenshot
Do you know that you can also take a screenshot by slide upward with Three fingers on the screen? If not then you will read about this method to take a screenshot fast.
This is the best and easiest method to take a screenshot, all you have to do is follow the steps given below.
- First of all, go to Settings
- Then Scroll down, Tap S-Capture and enable Three Fingers Swipe Screenshot
- That’s It 🙂
Must See: Take Screenshot In Redmi 9C
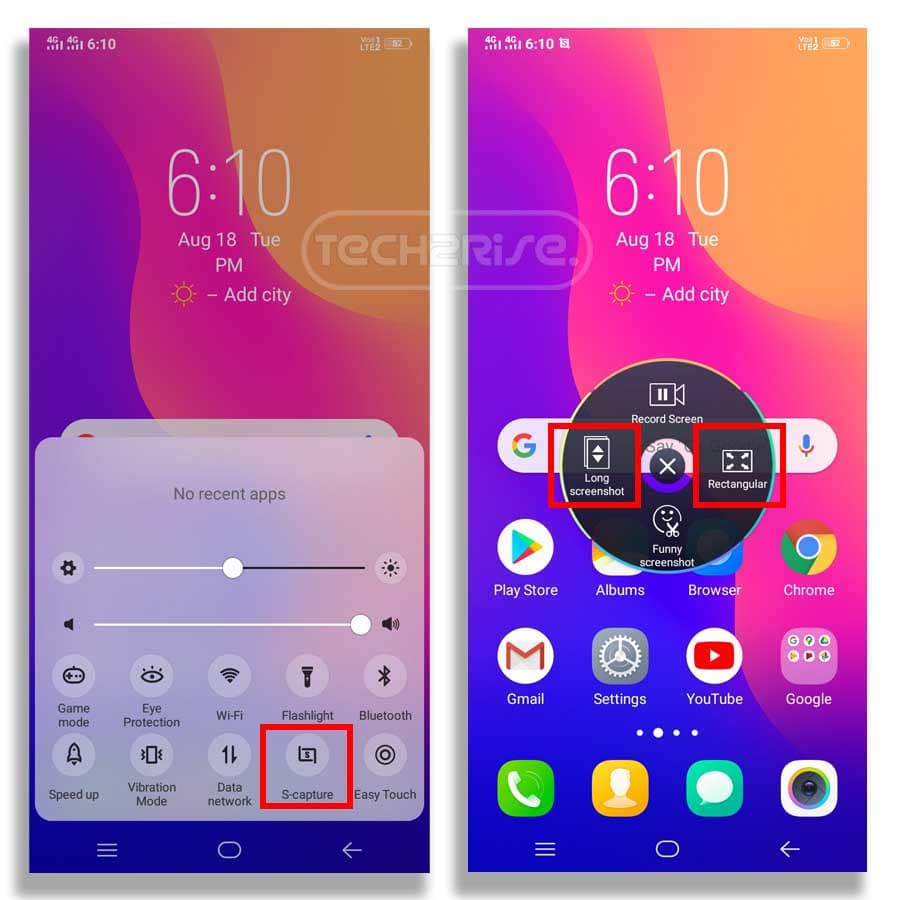
Method #3 – Take Screenshot In Vivo Y20 Using S-Capture
If you want to take long screenshots of any website, then you can use this feature. Also, you can take rectangular screenshots and record the screen, To do this, follow the steps given below.
- First, open the Notification Panel from the bottom of the screen.
Note: You will only see this interface in Android 8 and 9 because in Android 10 the Notification Panel is available on the top
- Then find and click S-capture.
- After that, you will see options like Rectangular or Long Screenshots.
- That’s It 🙂 Tap and take a screenshot.
Must Read: Take Screenshot In Moto One Power
Method #4 – Take Screenshot In Vivo Y20 Using Your Voice
Today all Android phones come with Google Assistant service, you can take screenshots with a simple voice command. “Ok Google, take a screenshot,“ after which the screenshot of whatever will be on your screen will be captured.
You can also add commands together and say “Ok Google, take a screenshot and share it on Facebook, Twitter.“
Method #5 – Take Screenshot In Vivo Y20 Using Application
If you want to take a screenshot using the application, then I have come up with the best screenshot application for you. The name of this screenshot application is Screenshot Easy, which allows you to take screenshots in a very easy way.
Related Articles:
- How to Take Screenshot In Samsung M31
- Take Screenshot In LG V20
- Take Screenshot In Realme C15
- How to Take Screenshot In LG Stylo 5
Final words:
So this article was about how to Take Screenshot In Vivo Y20. I hope you find this article useful and good! You can see more similar Take Screenshot guides from here.
Which method would you like to try first?
If you have any questions related to this article, then you can ask me in the comment section, I will definitely reply to your comment.
Don’t forget to subscribe to our newsletter to get new updates related to the posts, Thanks for reading this article till the end.


![How to Screen Record On Samsung Galaxy Tab A8 10.5 [2 EASY WAYS]](https://tech2rise.com/wp-content/uploads/2022/02/How-to-Screen-Record-On-Samsung-Galaxy-Tab-A8-10.5-250x150.jpg)