Hello Friends! I’ll give you a detailed tutorial on How to Take Screenshot on Samsung Galaxy F34 in this comprehensive article. Learn how to snap screenshots quickly and easily by following the steps.
So, if you are looking for a way to take screenshots in Samsung Galaxy F34 then you have come to the right place.
The essential ability that comes in handy for sharing important information, preserving important details, and even fixing technical issues is taking a screenshot on your Samsung Galaxy M34.
This article is carefully designed to lead you through a range of techniques for easily taking screenshots, regardless of whether you own the Samsung Galaxy M34 or another handset from the Samsung family.
Six Different Methods to Capture Screenshots
- Using Key Combination
- Palm Swipe to Capture gesture
- Notification Panel
- Using Your Voice (Google Assistant)
- Assistant Menu
- Third-Party Application
How to Take Screenshots on Samsung Galaxy F34
In this guide, you have been told 6 easy ways to take screenshots, with the help of which you will be able to easily take screenshots in your Samsung Galaxy F34.
So let’s know about the methods without any delay.
1. The Classic Approach: Using Hardware Buttons

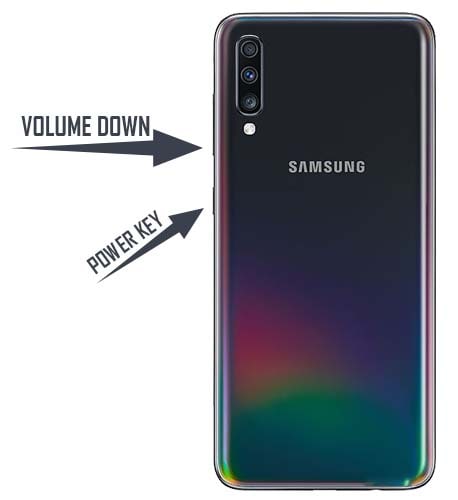
The most common method to capture a screenshot on Samsung Galaxy F34 involves using the hardware buttons. Follow these steps:
Locate the Buttons: Identify the volume down button (usually on the left side) and the power button (typically on the right side) of your Samsung device.
Select the Content: Navigate to the screen you want to capture as a screenshot.
Capture the Screenshot:
- Simultaneously press and hold the volume down button and the power button.
- Hold them for a second until you see a quick animation or hear a shutter sound.
Access the Screenshot: The screenshot will be saved in the “Screenshots” folder in your device’s Gallery app.
Must Read: Take a Screenshot In Samsung Galaxy M34 5G?
2. Gesture Magic: Palm Swipe to Capture

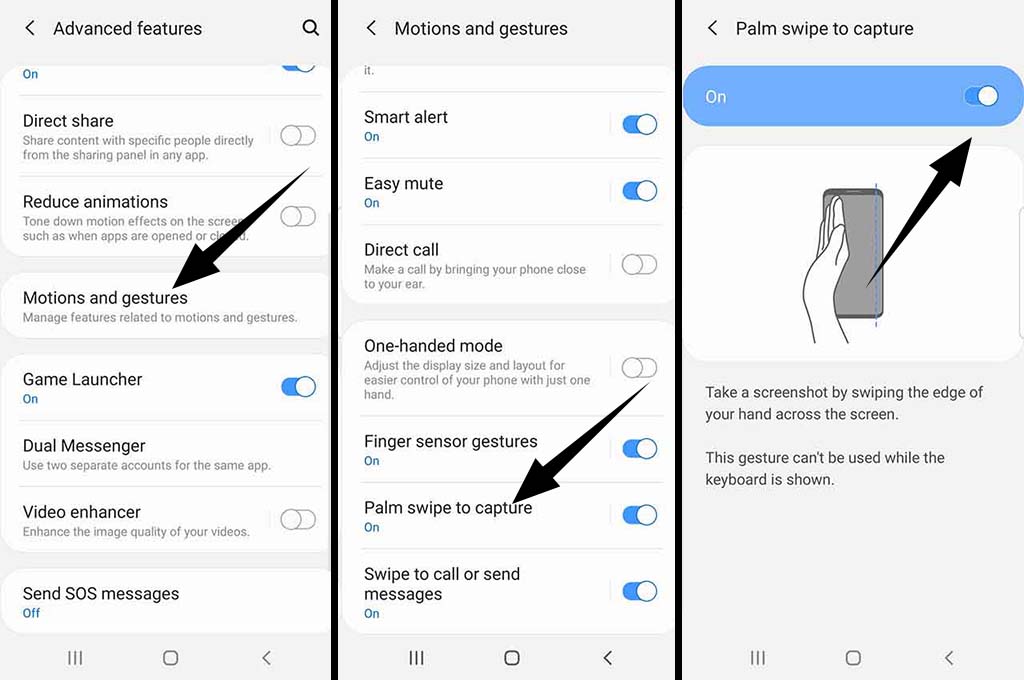
Samsung Galaxy F34 offers a unique feature called “Palm Swipe to Capture,” which allows you to capture a screenshot with a simple hand gesture. Here’s how to enable and use this feature:
1. Enable Palm Swipe Gesture:
- Open the “Settings” app.
- Scroll down and select “Advanced features.”
- Toggle on the “Palm swipe to capture” option.
2. Capture the Screenshot:
- Open the content you want to capture.
- Place the edge of your hand horizontally on either side of the screen.
- Swipe your hand across the screen, making contact with the display.
3. Access the Screenshot: The screenshot will be saved in the “Screenshots” folder in your Gallery app.
Read Here: Take a Screenshot In Samsung Galaxy F62?
3. Instant Access: Screenshotting via Notification Panel
Another way to capture screenshots on Samsung Galaxy F34 is through the notification panel:
- Open the Notification Panel: Swipe down from the top of the screen to access the notification panel.
- Find the Screenshot Option: Look for the “Screenshot” option among the quick settings toggles.
- Capture the Screenshot: Tap the “Screenshot” icon, and the device will immediately capture the current screen.
- Access the Screenshot: The screenshot will be saved in the “Screenshots” album within the Gallery app.
4. Voice Commands: Screenshotting with a Verbal Twist (Google Assistant)
- First, press and hold the home button
- Then Say ”Ok Google, take a screenshot,”
- That’s It 🙂
Must See: How to Take Screenshot On Galaxy A02S?
5. Ease of Access: Screenshotting via the Assistant Menu

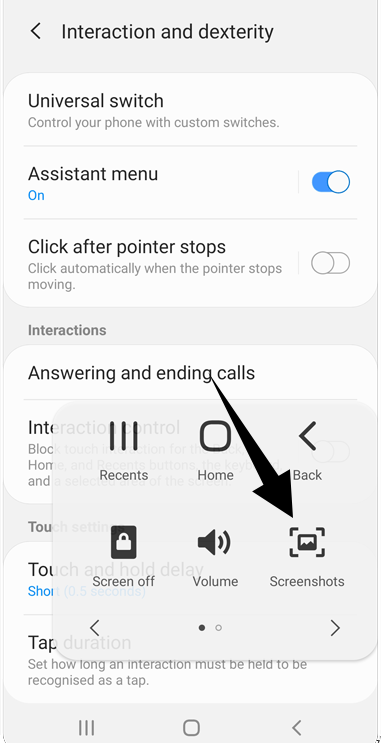
For those who require accessibility features, Samsung Galaxy F34 offers the Assistant Menu, which provides a floating on-screen menu for various functions, including taking screenshots:
1. Enable Assistant Menu:
- Open the “Settings” app.
- Navigate to “Accessibility” >> “Interaction and dexterity” >> “Assistant menu.”
- Turn on the “Assistant menu” toggle.
2. Capture the Screenshot:
- Tap the Assistant Menu icon (usually a small circle) to open the menu.
- Tap the “Screenshot” option.
- The screenshot will be captured and saved in the Gallery.
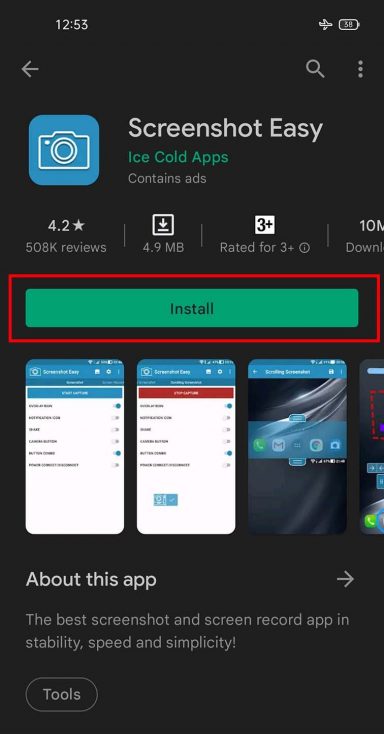
6. Using Third-Party Application

- First, Open the Google Play Store
- Then type in the search box ”Screenshot Easy”
- That’s It 🙂
Must Read: Take Screenshot In Samsung Galaxy M11?
Long Screenshot on Samsung Galaxy F34
- First, Go to the Settings app
- Then scroll down and select Advanced Features
- Now Select screenshot and screen recorder here
- Finally, Enable the Screenshot toolbar
- That’s It 🙂
How to View Your Taken Screenshots?
- If you want to see the screenshots you have taken, Go to the Gallery app.
- Then go to the screenshot folder.
- Here you will see all the screenshots that you have taken.
- That’s It 🙂
Must See: Take a Screenshot On Samsung Galaxy Tab A 8.0?
Details: Samsung Galaxy F34
Samsung has launched a new phone called Galaxy F34, This smartphone comes with a 6.5-inch FHD+ Super AMOLED screen with a 1080 x 2340 pixels resolution, and in terms of processor, it has an Exynos 1280 (5 nm) processor.
This phone has been launched in TWO variants, The first is 6GB RAM and 128GB storage, and the Second is 8GB RAM and 128GB storage.
Must See: Take a Screenshot In Samsung Galaxy A20?
Samsung Galaxy F34 has a Triple-camera setup, with the primary camera being a 50-megapixel, 8-megapixel telephoto lens, and then a 2-megapixel macro sensor.
Also, a 13-megapixel single selfie camera has been given to take the best selfie. Talking about the battery, it has a big 6000 mAh battery with 25W fast charging.
If you are facing any type of problem in your Galaxy F34, then you can read the Troubleshoot Common Problems in the Galaxy F34, maybe your problem can be fixed.
Wrapping Up:
So this Step-by-step article was about How to Take Screenshot on Samsung Galaxy F34.
I hope you find this article useful and good! You can see more similar Take Screenshot Guides here.
Which method would you like to try first?
If you have any questions related to this article, then you can ask me in the comment section, and I will definitely reply to your comment.
Don’t forget to subscribe to our newsletter to get new updates related to the posts.
Thanks for reading this article till the end….! 🙂


![How to Screen Record On Samsung Galaxy Tab A8 10.5 [2 EASY WAYS]](https://tech2rise.com/wp-content/uploads/2022/02/How-to-Screen-Record-On-Samsung-Galaxy-Tab-A8-10.5-250x150.jpg)